Today I am very happy!
Because my 3 Blankets finished and two of them are now on the way going to my Mum and my Aunt, and third one is for my friend's baby:)
It will be surprise for them,,, but I am sure they will love it.
You will see the pictures of them, and also if you like to use the same patterns for your project, you will find the explanation of those patterns in my ex-posts . Also I will put a link for you in this post.
Here are they:)
"V STITCH" Blanket :(if you click the title, you can find the details in my ex-post)
2-hole WAVE BLANKET :(if you click the title, you can find the details in my ex-post)
NOW time to start a new one:)
Let's talk to you soon.
Have a great day., Oya Mearns
PS: All my posts will be published for helping to you. BUT of course if you would like toDONATEfor my “piggy bank”, I can then get some more yarn for my projects and share with you. If you do so, you will find the “DONATE” button at the top of the blog :)If youFOLLOW me by email, you can get a message too. You will find the SUBMIT button on right side under the Block Archive.
Helloooo,
I would like to share one of my lovely blanket, I am still working on it, it will be for my best friend.
I used colourful yarn for this project but you can use different colours in each 2 rows. I looks brilliant. Next time I will use different colours.
On this project you need to know what "2dctog" means. Here is the explanation of it: 2dctog: : (double crochet 2 stitches together) Yarn over (YO) hook, insert hook in stitch , pull up a loop, 3 loops on hook. YO hook, pull through 2 loops. YO hook insert in next st, pull up a loop, 4 loops on hook. YO, pull through 2 loops, 3 loops on hook. YO pull through last 3 loops. One dc2tog made.
You need 17 chains for every repeat of the pattern. (Multiple 17 ch.)
in here I am trying to explain this pattern with 34 chains.
but ofcourse you make/calculate chains according of your project. For example I ve done 170 chains for my blanket. PS: I use the standard way to do it, BUT if you use "back loop ONLY" looks much much more amazing!
R1:
make 1dc in the 4th ch from the hook. (unworked 3 chains count as 1dc).
then make 1dc in following next 6 ch. (now you have 7dc+ first 3ch count as 1dc)
then make 2 chain.
then 1dc in the same stitch.
then 1dc in following 7ch. (which means 7 times: 1dc in 1 ch.)
then skip 2ch.
then 1dc following ch. (repeat 7 times more)
then make 2 ch.
then 1dc in the same stitch.
then 7 times make 1dc in each ch. then turn.
R2:
make 3 ch. then make 2dctog in following 2 ch.
then make 5 times 1dc in 1ch.
then make 1 dc in 2ch-space,
make 2 ch
and again 1dc in the same 2ch-space,
then 7 times make 1dc in 1 ch.
then skip 2 stitches
then 7 dc in each stitch.
then 1dc in 2ch-space,
make 2 ch.
then 1dc in 2ch-space,
then 5 times dc in each st.
then make 2dctog and 1dc at the end of the st.
R3 and ... : Repeat R2 as many times as you need to.
IMPORTANT thing is at the end of the rows, in last 3 stitchec, you will make dctog then 1 dc.
beginning of the rows , you will make 3 ch, then dctog.
Because of that your blanket's right and left sides will be strait,
I was inspired by Yolanda Soto-Lopez. (you will find her Video Tutorial below) Video Tutorial : by Yolanda Soto-Lopez
and here is my lovely blanket! Isn't it nice?
EDGE:
I will explain this EDGE now;
1- start anywhere, make 2 ch.
2- skip 2ch, make 1dc then 3ch. and make 2 more dc in the previous space.
3- then skip 3 ch. make 1 slip st. then 2 ch., and repeat 2 and 3 steps.
Have a Great day:) , Oya Mearns PS: All my posts will be published for helping to you. BUT of course if you would like toDONATEfor my “piggy bank”, I can then get some more yarn for my projects and share with you. If you do so, you will find the “DONATE” button at the top of the blog :)If youFOLLOW me by email, you can get a message too. You will find the SUBMIT button on right side under the Block Archive.
Helloooo,
Finally I finished a new Blanket for my friend.
One day she said to me " I want one of them", because when she saw some of my work's pictures on Instagram, she said : "Oh, what a lovely colours, I love it love it love it..."
And I decided to do "Afghan RIPPLE (Wave)" Blanket for her. And also I call this blanket : ARZU's COUNTRY LIFE Blanket :)
It is lovely pattern and fun doing it. I hope she will like it.
This is the Video from my Husband David Mearns while giving the gift to my friend's daughter Selin:
Before getting started, you should know these: o : Chain (ch) x : Single Croche (sc) tr: Triple - Treble stitch (tr) dc: Double Crochet (dc)
tr stitch:Yarn over hook (twice), insert hook from front to back in the center of the chain. Yarn over, draw the yarn through the chain (4 loops on hook). Yarn over, draw yarn through 2 loops on hook (3 loops remain on hook).Yarn over, draw yarn through 2 loops on hook (2 loops remain on hook).Yarn over, draw through 2 loops on hook (one triple crochet complete). (short version: Yarn over (twice), insert hook in the center of next chain, yarn over, draw yarn through stitch, [yarn over, draw yarn through 2 loops on hook] 3 times. Repeat across to end of foundation chain. ) dc stitch :Yarn over, insert hook in the center of next chain, yarn over, draw yarn through stitch, yarn over, draw yarn through 2 loops on hook, yarn over, draw yarn through 2 loops on hook.
In this pattern, each of "wave" or "ripple" has 17 chains.
Which means: 17 ch = 1 wave = Repeat part
I used 3.5 size hook and Nako Astra Yarn
On my project, I made 8 Waves in each lines, which means I started with 136 Ch, (8x17=136)
You will find the "diagram" in this picture (from my work notebook with my hand writing), but also I will try to explain it step bu step to you.
*if you click on the picture, you will get the original size
So shell we begin? 1- make 136 chain 2- make 1 ch, and make sc in each of st. all the way. Turn.
(I used the same colour for 1st and 2nd rows) 3- change the colour, make 4 st. , make 1 tr in the same st. - make 2 tr in the same next st. - make 2 tr in the next 1st. -
(skip 1ch, make 1tr in the next st.) repeat this 4 more times) -
skip 1c -
(make 2tr in the next 1st.) repeat this 5 more times)-
(skip 1ch, make 1tr in the next st.) repeat this 4 more times) -
skip 1c -
........
at the end of line, when you have last 3st., make 2tr in each of 3st. and turn. 4- make 3ch, and make 1dc in each of st through the line. Turn 5- Repeat 3th step with the same colour. Turn. 6- change the colour (the same colour which used in 1st and 2nd lines), make 3 ch. and make 1dc in each of st. through the line. Turn 7- Repeat 3th, 4th, 5th and 6th steps till reach the length what ever you decide.
... 8- when you reached the length, make 1 ch, and make sc in each of st. all the way. and close-up.
If I call a GROUP for the 3th, 4th, and 5th lines, I made the same colour for those 3 lines, but every time I used the different colours for the each of group.
BUT I use always the same colour for the 1st, 2nd, 6th, and repeat ones of 6th , and 8th lines.
You will understand what I mean if you look at the pictures of my project.
VIDEO: My role model was Michael Sellick. (The Croched Crowd) Written Tutorial: design by Ann Regis from Red Heard
EDDING:First of all I made dc all around the blanket then I have done very simple border around.
Border Diagram is this:
If you click the diagram you will get the big picture.
Hope you like it,
If any questions pls send me an email (you will find the contact form on the right)
and also please SUBMIT to my blog, if you wanna get informed when I put a new post. Which means you will follow my blog:)
Today is very rainy and very dark. Very depressing weather, really!
Well, we are in September, what else we can expect, right?
I have my coffee and thinking how I can reach people who ever needs some help, ideas or trying to learn some new crochet or knitting patterns.
I remember, when I saw brilliant, very colourful baby blanket from Internet; I thought myself, why not try to do this? I didn't know anything on that time about "Crochet".
But especially in our century, everything you can learn from Internet. The important thing you have to use right "word" while searching, And definitely you can finally find something relevant on your search. There are a lot of people out there who gives their idea, explain how they can do it from the beginning, step by step.
So I started from the beginning. What does it mean "chain", "hook", "knot stitch", "back loop", "single crochet", "double crochet", ext. I am not joking, I was very "illiterate" person about CROCHET !
But look at me now, Finally, I can make my own crochet blankets, understand the "diagrams". I am very happy for that.
I created this blog for the people who are similar to the way I was before Crocheting took over my life. :)
Now time to make my "blog" visible for the people who ever needs some help.
On this situation I need your help too!
There are different ways for helping me.
You can "SUBMIT"your email address and you can FOLLOW my "blog" by email. (You will find the "SUBMIT" button on the right tab)
You can fill the "CONTACT FORM", and send me an email, (You will find the "FORM" on the right tab)
You can click on the "PIN it" buton and publish my "blog" or any of my post which you like you can "PIN it". (You will find the "PIN it" button on the right tab for whole blog, OR if you wanna "PIN it one of the post, you will see under the post, which each posts has a little "icon" of "Pinterest")
You can "SHARE" my blog with your "FACEBOOK" friends.
(You will find the "FaceBook" button on the right tab or under the post, which each posts has a little "icon" of "FaceBook")
You can "SHARE" my blog with your "TWITTER" friends.
(You will find the "Twitter" button on the right tab or under the post, which each posts has a little "icon" of "Twitter")
SO What do you thing? Can you help me?
The most importantly; you will see the "DONATE" button on the right, if you wish of course you can donate for me to buy some more yarn for my upcoming projects. If you do so definitely you will make me CHUFFED!
Next post will be NEW CROCHET PATTERN, I will give you the explanation of it with my work's photos. Hope you will enjoy it.
Talk to you soon.
Have a Great Day, bye for now :)
Oya Mearns
Hi there.!
This time I will try to explain and compile one of my favorite style of Crochet.
Very simple, very fast , very easy and most important very pleasant to do.
I love to play with colours, gives me a lot of fun. Using different colours is so fun and magical. After a while looking at the colourful "zig-zag" effect makes me mesmerised.
I found that there are a lot of ways to do this pattern and it has a lot of different names. People calls; Ripple, Wave, Chevron, ZigZag,Rugged Riples,...
I choose to call it : "Zig-Zag" Stitch.:)
This stitch has various combinations:
Some people make it with only Double Crochet (dc), ot only Single Crochet (sc), even mixed (dc and sc).
Some people use ONLY back loops (takes more time but looks excellent) or standard way (passing through 2 loops together).
You can do with one colour only, or change the colour in every row, maybe in 2 rows,
This pattern stitch is all about increasing and decreasing.
Explanation of my works:
Foundation Chain line : Multiple of 14, plus extra 2 chains.
1 "Wave" = 14 ch. , I've done 14 Waves = 196 ch. + 2 = 198 ch. was my foundation line.
I used NAKO Luks Minnos yarn and NAKO Astra yarn with hook size 3.5 .
FIRST Line is the important one, you must be careful while counting. After then everything will be easy for you.
I use dc and dc3tog for my project, but also you will find another combination below.
dc3tog:DoubleCrochet 3 stitches Together : yarn over(yo) hook, insert hook in stitch(st), pull up a loop(lp), 3 loops on hook. yo hook, pull through 2 loops, 3lps on hook. yo, INSERT hook in the NEXT stitch, yo, pull up a lp, 5 lps on the hook. yo, draw through 2 lps, 4 lps left on hook. yo draw through all 4 lps left on the hook.
Diagram of my work: (you will find the Video Tutorial below of this section)
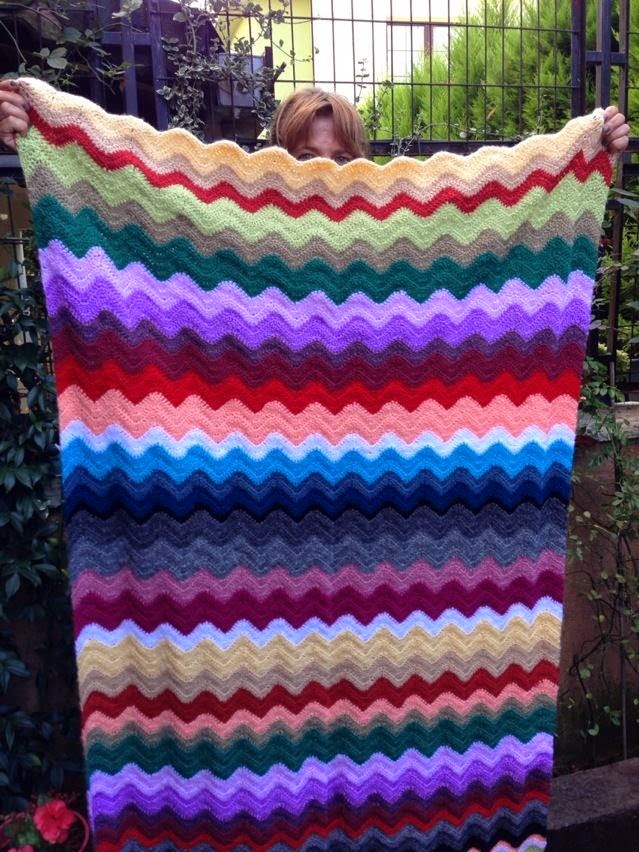
Here is the gorgeous blanket which I ve done for one of my friends new born baby girl:)
and here is the Blanket of my 26 years old daugther Ayca:) She loves to use this while watching TV in the late Winter nights :) (behind of the blanket is ME by the way )
Foundation Chain line : Multiple of 12, plus extra 3 chains.
dc2tog:double crochet 2 stitches together: Yarn over (YO) hook, insert hook in stitch(st) , pull up a loop, 3 loops on hook. YO hook, pull through 2 loops. YO hook insert in next st, pull up a loop, 4 loops on hook. YO, pull through 2 loops, 3 loops on hook. YO pull through last 3 loops. that's it !
As I told yousome peole use ONLY BackLoops, and Single Crochet, So if you wanna have some ideas about it here is the Video: by Pip Lincolne
When you finish your project I would like to see it too, could you please send me a picture of it? Now time to have a cup of coffee, Cheers ! Have a great day. Oya Mearns
All my posts will be published for helping to you. BUT of course if you would like toDONATEfor my “piggy bank”, I can then get some more yarn for my projects and share with you. If you do so, you will find the “DONATE” button at the top of the blog :)If youFOLLOW me by email, you can get a message too. You will find the SUBMIT button on right side under the Block Archive.
When I saw this stitch, absolutely LOVE it! Another great stitch. It is so simple and fast.
It can be used for shawls, scarf, baby blankets.
Actually I have done both, Diagonal and Straight.
Here are the links (below) of 2 different types of Crochet which definitely help you before start your project. And I strongly advice to you that you should watch the video tutorials to get idea of increasing/decreasing boxes,
And you can use 1 colour or different colour in every line.. depends on your feelings :)
DIAGONAL Style- Corner to Corner:
You are starting with 1 box, then 2 boxes, then 3 boxes, ... suddenly you will see it will easily build up. Every beginning of the line you are adding 1 box.
Do the corner to corner until the side has reached the across distance you need.
If you stop both sides from growing at the same time will cause your blanket to be square.
If you would like to have a rectangular blanket, continue to grow in one direction only, then start decreasing when you get to the length.
VIDEO Tutorial : Corner to Corner Afghan Project by Michael Sellick - The Crochet Crowd
WRITTEN Tutorial : How to crochet diagonally by the lazy hobby hopper
I used NAKO, Baby Luks Minnos Yarn and NAKO Astra Yarn
and Hook size : 3.5
Thanks for stopping by, have a Good Day - Oya Mearns
All my posts will be published for helping to you. BUT of course if you would like toDONATEfor my “piggy bank”, I can then get some more yarn for my projects and share with you. If you do so, you will find the “DONATE” button at the top of the blog :)
If you FOLLOW me by email, you can get a message too. You will find the SUBMIT button on right side under the Block Archive.


.jpg)


.JPG)
.JPG)


.JPG)

.JPG)
.JPG)
.JPG)
.JPG)
.JPG)

.JPG)
.JPG)
.JPG)
.JPG)
.JPG)