Tuesday, 1 November 2016

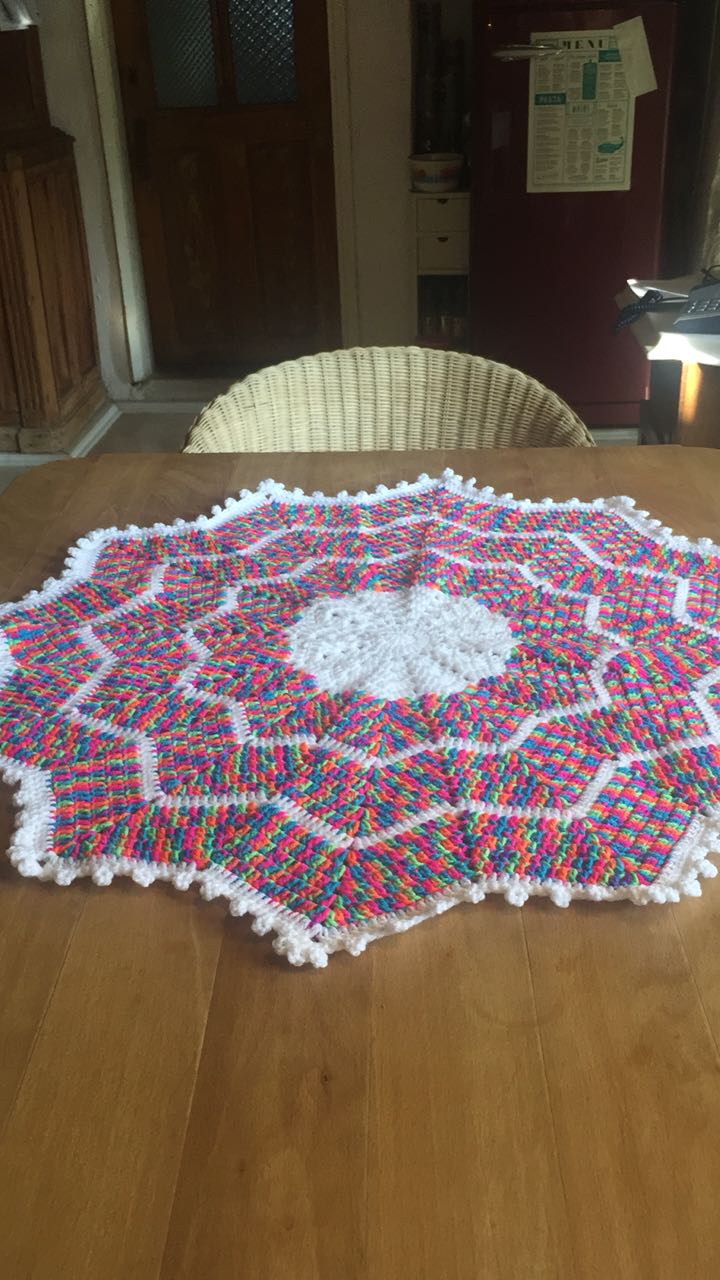
Crochet: 12-pointed star ripple table cloths (or blanket)

Helloooo,
When my last project finished I was trying to find new project, and I found brilliant pattern from internet. Loveee it! Suddenly I started with my some left over yarns.... then I loved more! When I was Scotland I bought some brilliant yarns and I made a table cloth for one of my dear friend's village house. She liked it very much. You will see the pictures of it (below).



Yarn: thich
Hook: 4.5 (even 5 mm much better)
Pattern: Ravelry
Design by Celeste Young.

Stitch Abbreviations: 
ch: chain
st: stitch
sl st: slip stitch
dc: double crochet
small shell: (dc, ch 2, dc) in same space
large shell: (2 dc, ch 2, 2 dc) in same space


Pattern:  (I used 2 colors)Using color White, ch 4. Join with sl st to form a ring.
Round 1: Ch 2 (counts as first dc throughout pattern), work 11 dc in ring (12 dc). Join with sl st in top of ch2 from beginning (join in this manner throughout pattern).
Round 2: Ch 2, dc in same st, 2 dc in each dc around (24 dc). Join.
Round 3: Ch 2, *skip next dc, work (dc, ch 2, dc) in next dc. Repeat from * around, ending with dc in base of beginning stitch, ch 2, join with sl st in top of ch2 from beginning.
Round 4: Sl st into ch 2 space, work (ch 2, dc, ch 2, 2 dc) in ch 2 space, * work large shell in next ch 2 space, repeat from * around. Join.
Round 5: Sl st into next st, ch 2, * work large shell in ch 2 space, dc in next dc, skip next 2 dc, dc in next st. Repeat from * around. Join.
Round 6: Sl st into next st, ch 2, dc in next st, * work large shell in ch 2 space, dc in each of next 2 dc, skip the next 2 sts, dc in each of next 2 dc. Repeat from * around, ending with skip 2 sts. Join, cut yarn.

Round 7: Using second color (I used the same white color for this) , sl st into next st, ch 2, dc in next 2 sts, * work small shell in next ch 2 space, dc in next 3 sts, skip 2 sts, dc in next 3 sts. Repeat from * around, ending with skip 2 sts. Join, cut yarn.

Round 8: Using second color , sl st into next st, ch 2, dc in next 2 sts, * work large shell in ch 2 space, dc in next 3 sts, skip next 2 sts, dc in the next 3 sts. Repeat from * around, ending with skip 2 sts. Join.
Round 9: Sl st into next st, ch 2, dc in next 3 sts, * work large shell in ch 2 space, dc in next 4 sts, skip next 2 sts, dc in next 4 sts. Repeat from * around, ending with skip 2 sts. Join.
Round 10: Sl st into next st, ch 2, dc in next 4 sts, * work small shell in ch 2 space, dc in next 5 sts, skip next 2 sts, dc in next 5 sts. Repeat from * around, ending with skip 2 sts. Join.
Round 11: Sl st into next st, ch 2, dc in next 4 sts, * work large shell in ch 2 space, dc in next 5 sts, skip next 2 sts, dc in next 5 sts. Repeat from * around, ending with skip 2 sts. Join.
Round 12: Sl st into next st, ch 2, dc in next 5 sts, * work large shell in ch 2 space, dc in next 6 sts, skip next 2 sts, dc in next 6 sts. Repeat from * around, ending with skip 2 sts. Join, cut yarn.
Round 13: Using color G, sl st into next st, ch 2, dc in next 6 sts, *work small shell in ch 2 space, dc in next 7 sts, skip next 2 sts, dc in next 7 sts. Repeat from * around, ending with skip 2 sts. Join, cut yarn.

Continue working in rounds in pattern as established, always working 1 round with small shells followed by 2 rounds with large shells. You will work 5 rounds of each color, 1 round of white (always a small shell round), 5 rounds of next color, 1 round of white, and so on. Continue repeating rounds 8-13 with the number of dc increasing in each large shell round between the "ch 2 space" and the "skip 2 sts" until the last round of rainbow colors is worked. Join, cut yarn.

Final round: I made picot edge-  4sc, picot, 4sc, picot... at the corners 3 picots.


Orijinal picture - By Celeste Young
Have great day, let's meet again on my next project, next post.Oya Mearns
PS: All my posts will be published for helping to you. BUT of course if you would like to DONATEfor my “piggy bank”, I can then get some more yarn for my projects and share with you. If you do so, you will find the “DONATE” button at the top of the blog :)If you FOLLOW me by email, you can get a message too. You will find the SUBMIT button on right side under the Block Archive.

Thursday, 27 October 2016

Crochet: Easy Scarf

Hello,
I decided to do a scarf to one of my old friend.
It is very easy, simple to make.
Soo lovely:)

I used Nako BonBon Classic - Grey (98242) x2 and Dark Purple (98232) x1
Hook: 4.5 mm

I start to make 160 chains, then in each rows sometimes DC, sometimes SC.
But ALL BACK LOOPS .
Length: 180 cm,    Width: 20 cm


Oya Mearns

PS: All my posts will be published for helping to you. BUT of course if you would like toDONATEfor my “piggy bank”, I can then get some more yarn for my projects and share with you. If you do so, you will find the “DONATE” button at the top of the blog :)If you FOLLOW me by email, you can get a message too. You will find the SUBMIT button on right side under the Block Archive.

Monday, 10 October 2016

Crochet: Classic Baby Blanket

Hellooo there:)
Again I made a classic blanket for our friend's new born baby girl:)
I love this pattern, very easy, very simple but elegance.
I really hope they will like it, most importantly baby like it.


I used Nako Baby Tweed Joyful New - 81039 (100g) (6 ball)
I used 5 of them for the blanket and plus one of them for the edge(border)
Hook: 4.5mm.


Main body:
Ch 142
Row1: Skip first 3 ch, DC next 139 ch, ch 3, turn (140 stitches)
Row2: DC in the BACK LOOP of each DC across, ch 3, turn
REPEAT Row2 ( I did untill finish my 5 balls)
last Row: DC in the back loop of each DC across, DO NOT fasten off, turn work to begin the border.

Border: I made V Stitches all around 4 times,
BUT the person's border who made this blanket pattern is different.
Here is the WebPage of this pattern: Classic Baby Blanket


Have a great day,
Oya Mearns

PS: All my posts will be published for helping to you. BUT of course if you would like toDONATEfor my “piggy bank”, I can then get some more yarn for my projects and share with you. If you do so, you will find the “DONATE” button at the top of the blog :)If you FOLLOW me by email, you can get a message too. You will find the SUBMIT button on right side under the Block Archive.

Crochet : another "Granny Triangle Shawl"

Hi,
This summer time I was in Scotland (Montrose) with my husband for visiting my mother in law. Almost everyday was rainy, dark, cloudy ! So I bought some yarns and start to crochet, and finished in there.
I loveeee the yarns, but I have to tell you those yarns are very expensive in there.
I made this shawl for my very very special friend SİBEL :)


Here we go!

Yarn: James G. Brett- Party Time- Chunky - 5 of themx100g
Hook: 6.5 mm


I love the flexibility of this design. You can make it what ever size suits your 
needs. Here is the shawl I crocheted with this pattern (on below). Choose any yarn you wish for this project. Grap your hook and start!


(Please note that this pattern is not my original design. I created my shawl using the following diagram from GARN studio  and also I really get brilliant help from Brittany"s web page(Brittany is the Founder of B.hooked Crochet)

You will find every details of this project in the links on below. 

(Pattern Diagram, Video Tutorial. Written Tutorial)


Diagram: (NOTE: I did NOT made tr stitch! I did ALL dc )
ch
dc in ch
tr
row explained in pattern, beg first row


How to crochet a Granny Triangle Shawl: Video Tutorial
How to crochet a Granny Triangle Shawl: Written Tutorial 


Have a great day,
Oya Mearns

PS: All my posts will be published for helping to you. BUT of course if you would like toDONATEfor my “piggy bank”, I can then get some more yarn for my projects and share with you. If you do so, you will find the “DONATE” button at the top of the blog :)If you FOLLOW me by email, you can get a message too. You will find the SUBMIT button on right side under the Block Archive.

Tuesday, 5 April 2016

Crochet: Motif Motif Blanket....

Helloooo,
This time I learned something NEW and loooove it!
So I decided to use this pattern for my daughter, because I would like to make a double size blanket for her. And very easy to work with the Motifs one by one, collect them according of the size then merge them..


I used Nako, Nakolen (194) - 7 bals
and Nako, Nakolen Dreams (31464) - 12 bals
I made 80 squares: (8 squares x 10 squares )
Hook: 4 mm

I used colorfull balls for first 7 row, then I used the grey balls for the last 2 rows(8. and 9.rows)
First, make 3 ch, then make circle,
1 row- 3 ch, and 11 dc in that circle (total 12 dc)
2 row- 3 ch, and 1 dc ın the same stitch, then make 2 dc in each of 11 stitch (total 24 dc)
3 row- in this row: 1 dc, 2 dc. 1dc, 2dc.....ın each of stitch (total 36 dc)
4 row- like 3.row, again 1 dc, 2 dc. 1dc, 2dc.....ın each of stitch (total 54 dc)
5 row- now like this: 1dc, 1dc, 2dc, 1dc, 1dc, 2 dc.....each of stitch (total 72 dc)
6 row - now we will make all sc, but like this: sc,sc,sc,sc,sc,sc,sc,sc,2sc,..... I mean 8 sc in each 8 stitches then 2sc the next one... (total 80 sc)
7 row- again dc we will make, like this: dc,dc,dc,dc,dc,dc,dc,dc,dc,2dc,...... I mean 9dc in each stitches then 2dc the next one...(total 88 dc)
8 row- now I changed the color for lart 2 rows: in this row we will make this circle a square, like this:
5dc in the same st, 1dc,1dc,1hdc,1hdc,1hdc,sc,sc,sc,sc,sc,sc,sc,sc,sc,sc,sc (11 times), 1hd,1hdc,1hdc,1dc,1dc, 5dc,..... as you understand that 5dc's makes the corners.
9 row- in the last row, corners will be the middle of the previous 5dc, I mean we will make 5dc in the third st of the perevious 5dc: and will go on like this:
5dc, dc,dc,dc,dc,dc,dc(6 times), hdc,hdc,hdc,...(13 times), dc,dc,dc,dc,dc,dc(6 times), 5dc,..........
fasten off.


 Written Tutorial: from Red Heart
Written Tutorial: from yarnspirations - English Ver.
Video Tutorial:How to Crochet A Blanket: Circle in the Square Afghan


Have a great day,
Oya Mearns

PS:
 All my posts will be published for helping to you. BUT of course if you would like toDONATEfor my “piggy bank”, I can then get some more yarn for my projects and share with you. If you do so, you will find the “DONATE” button at the top of the blog :)If you FOLLOW me by email, you can get a message too. You will find the SUBMIT button on right side under the Block Archive.